Introduction
In this blog, we are going learn about what is webpack, why, and how to use it in our project
About webpack
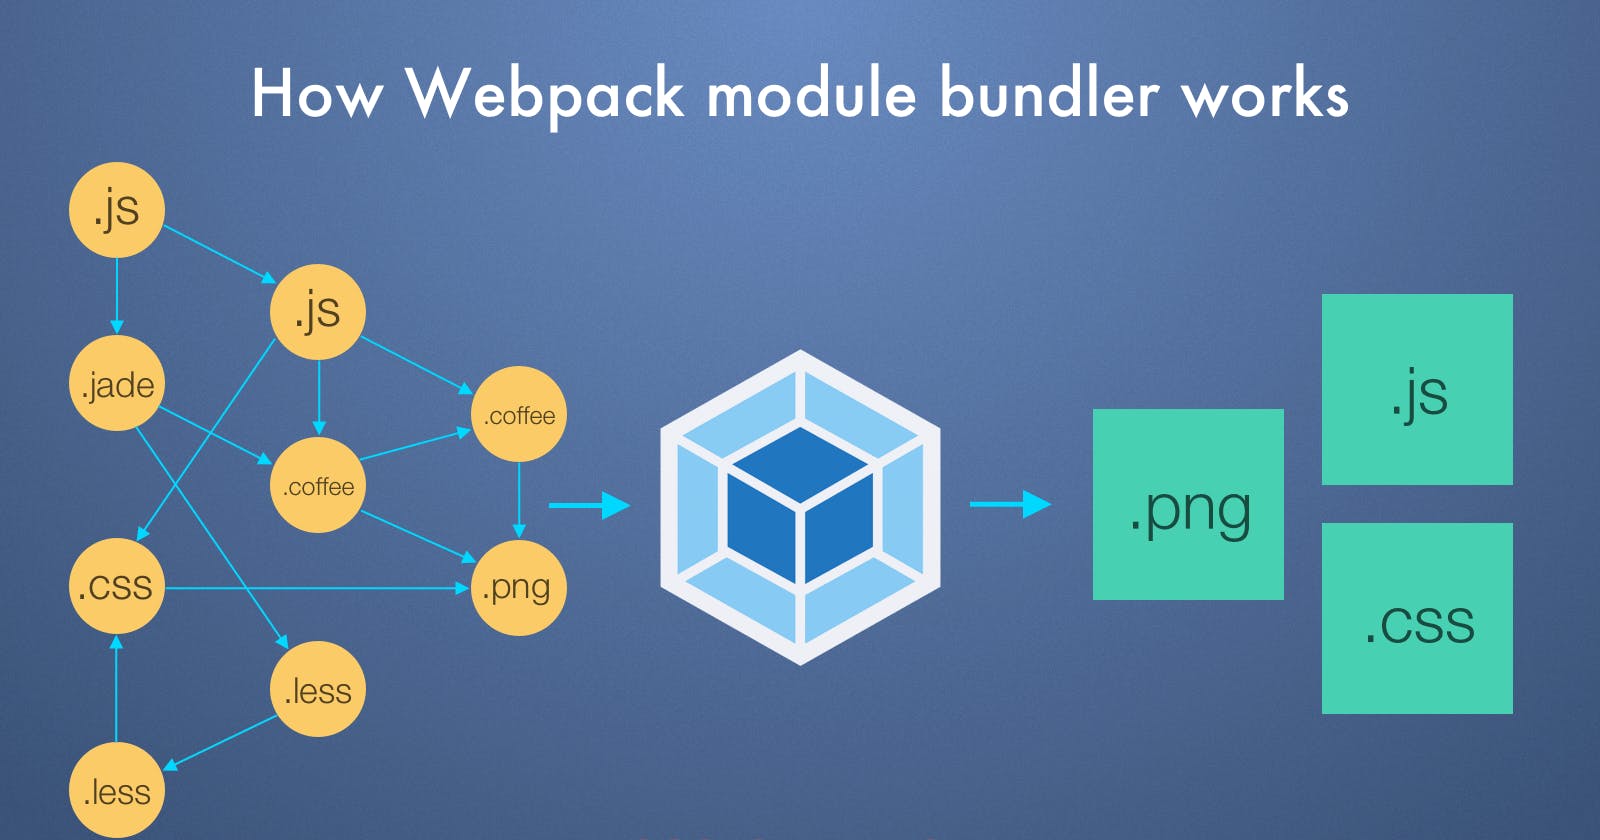
Webpack at its core is just a bundler for Javascript (basically to manage and bundle different dependencies and assets of a web application, such as JavaScript and CSS files. ). But now it can do more than that. Learn more about webpack.
Nowadays developers don’t just use HTML, CSS, and JS for web development. But also uses modern frameworks like react, tailwind, sass, etc to enhance the developer experience. But currently, browsers do not understand these advanced frameworks. It can only process HTML, CSS, and JS. So there is a need to convert the modern developer's code into something that browsers can understand.
Here is where blunders like webpack are useful. This is especially important for large and complex applications that may have many different dependencies and assets.
Overall, webpack is a powerful tool that helps developers to build modern web applications more efficiently and effectively.
For example:
Modern browsers can import js code from other js files using import syntax but it can't understand if we import files other than Js. But by using webpack we can also import other files such as images, stylesheets, etc, and process them into something that the browsers can understand.
Here is a simple example of how you might use webpack to import a CSS file and an image in a JavaScript file:
// Import the styles from the CSS file
import './styles.css';

// Import the image
import logo from './logo.png';

// Use the imported image in the JavaScript file
const imgElement = document.createElement('img');
imgElement.src = logo;
document.body.appendChild(imgElement);
To use this code with webpack, you would first need to install webpack and the appropriate loaders, such as the css-loader and file-loader. Then, you would create a webpack configuration file that specifies which loaders to use and how to bundle the assets.
For example, here is a simple webpack configuration file that uses the css-loader and file-loader to handle the CSS and image imports:
const path = require('path');

module.exports = {
  // Set the mode to development or production
  mode: 'development',

  // Entry point for the bundle
  entry: './src/index.js',

  // Output for the bundle
  output: {
    filename: 'bundle.js',
    path: path.resolve(__dirname, 'dist'),
  },

  // Loaders to handle different types of assets
  module: {
    rules: [
      // Use the css-loader to handle CSS imports
      {
        test: /\.css$/,
        use: ['style-loader', 'css-loader'],
      },

      // Use the file-loader to handle image imports
      {
        test: /\.(png|jpg|jpeg|gif)$/,
        use: [
          {
            loader: 'file-loader',
            options: {
              outputPath: 'assets/',
            },
          },
        ],
      },
    ],
  },
};
Once you have created this configuration file, you can run webpack to bundle your assets. The resulting bundle will include the CSS file and the image, and you can use them in your web application.
How to use webpack in our project
Note:
To follow along with me you have to install node js on your machine
Here is the GitHub link for this blog, you can follow along - https://github.com/Muthukumar-Muthu/webpack-intro
Let get started
First, we need to create a project. So create a folder and open the folder in VS code.
And we have to initalize a project. Run the following command
npm init -y. Now we have a package.json file in our folder.Now, we need to install webpack. Run the following command in CLI
npm i webpack -D.So we have installed webpack now.This is how package.json looks like
{
  "name": "webpack",
  "version": "1.0.0",
  "description": "",
  "main": "index.js",
  "scripts": {
    "test": "echo \"Error: no test specified\" && exit 1",
  },
  "keywords": [],
  "author": "",
  "license": "ISC",
  "devDependencies": {
    "webpack": "^5.75.0",
  }
}
Before jumping into the config file, We have to know that there are two modes in webpack. One is the production and the other is the development mode. These modes correspond to the different stages of your application's lifecycle, and they affect the way that webpack bundles your assets.
In development mode, webpack will bundle your assets in a way that makes them easy to debug and develop. This means that the bundle will be unminified and will include source maps, which allow you to debug your code in the browser. In this mode, we can use webpack-dev-server. It's just a node js server, where we can make use of HSR, page reloading, and much more features while developing.
In production mode, webpack will optimize your bundle for performance. This means that the bundle will be minified, which reduces its size, and any unused code will be eliminated. The resulting bundle will be optimized for production use, which makes it faster and more efficient.
By default, webpack runs in production mode, unless we specify them. For now, we are going to learn about production build. After that, we can learn about development mode.
Webpack expects us to provide information about the project like where should it start the process, what things it has to do when a particular file is encountered etc. So for that, we should create a file named
webpack.config.jsfor passing the command.The
webpack.config.jsfile is a configuration file for the webpack bundler. It is a JavaScript file that specifies how webpack should bundle your assets, such as which loaders to use and how to transform your source code.The
webpack.config.jsfile exports a JavaScript object that contains the configuration options for webpack. These options include things like the entry point for the bundle, the output for the bundle, and the loaders that should be used to handle different types of assets.
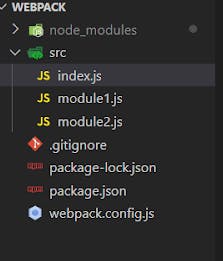
Before starting with config, we should have some files to give webpack to bundle. Let's create a folder named ‘src’ with some js files. GitHub commit link
//module1.js
export default function () {
  console.log("Log from module1");
}

//module2.js
export default function () {
  console.log("Log from module2");
}

//index.js
import module1Import from "./module1";
import module2Import from "./module2";

module1Import();
module2Import();
This how my current folder looks like

Let's start with webpack.config.js
Copy and paste the below code into
webpack.config.jsconst path = require("path") module.exports = { entry: path.resolve(__dirname, "src", "index.js"), output: { path: path.resolve(__dirname, "dist"), filename: "bundle.js", }, };The config file should export an object.
The
entrykey is used to specify the entry point for the bundle. The entry point is the starting point for webpack, and it is the file that will be used to build the dependency graph for the application. Theentrykey should be set to a string or an array of strings that specify the path(s) to the file(s) that should be used as the entry point(s) for the bundle. In our app, we have only one single entry point. So we can provide the index.js file path.The
outputkey is used to specify the output for the bundle. The output is the file that webpack generates when it bundles your assets, and it is the file that you will use in your web application. Theoutputkey should be set to an object that contains information about the output file. This object can have several properties, but the most important ones arefilename, which specifies the name of the output file, andpath, which specifies the directory where the output file should be saved.And now we can run the webpack. Edit the scripts key in the package.json file
"build" : "webpack"{ "name": "webpack", "version": "1.0.0", "description": "", "main": "index.js", "scripts": { "test": "echo \"Error: no test specified\" && exit 1", "build": "webpack" //here }, "keywords": [], "author": "", "license": "ISC", "devDependencies": { "webpack": "^5.75.0", } }Now we can run this command from CLI -
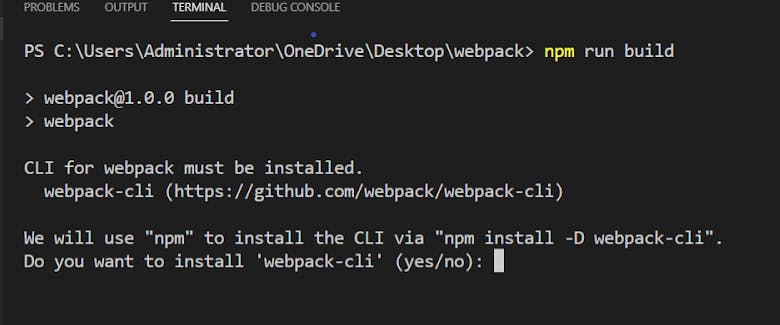
npm run build. This will run webpack in default production mode and gathers all the files from entry and bundles and minifies them.While we run the build command the following prompts in our cli saying we don’t have webpack-cli. Generally, we can run webpack using CLI (by using the command in CLI) or programmatically (using node js API)

Now we use CLI to run webpack. So webpack-cli is needed. Say yes now in cli for the prompt question or install using the following command
npm install -D webpack-CLINow run the following command
npm run build. Now a dist folder is created with minified and bundled js from all the files we had in the src folderIn webpack.config.js, entry key contains src/index.js. So index.js had imported from the module1 and module2 file. So code from both files is used and minified into bundle.js file in dist folder
All the code has been in the dist/bundle.js file.
// /dist/bundle.js
(() => {
 "use strict";
  console.log("Log from module1"),
  console.log("Log from module2");
})();
Yay, we just created a bundle using webpack 🎉🎊 !!!
I plan to publish more blog posts about advanced features of webpack, such as loaders, modules, and plugins. I will also cover topics related to webpack development. Stay tuned for more updates!
